Building a simple DIY contrast therapy routine at home is an effective way to boost muscle recovery, ease soreness and support circulation without expensive spa visits. By alternating hot and cold using your shower, basic compresses and a few household tools, you can create a practical protocol that fits around workouts or long days at the desk. The key is to respect safety guidelines, control the temperature, and follow sensible timing suggestions so you get the benefits without over-stressing your body.
Table of contents
What is contrast therapy and why use it at home?
Contrast therapy involves alternating periods of heat and cold exposure to the same area or the whole body. The hot phase encourages vasodilation (blood vessels open), relaxation and increased blood flow, while the cold phase triggers vasoconstriction, reduces swelling and can dull pain. Switching between the two is thought to create a “pumping” effect that may help with post-workout recovery, stiffness and mild joint discomfort. At home, this usually means using a shower, hot–cold packs, or a bucket / tub for feet and lower legs. You do not need extreme temperatures; instead focus on safe, controlled, and repeatable routines you can maintain several times per week.
Simple hot–cold shower routine for everyday recovery
The easiest way to start contrast therapy at home is with a regular shower. After your workout, begin with warm water (comfortably hot, not scalding) for about 2–3 minutes, letting it run over sore muscles such as quads, hamstrings and shoulders. Then switch to cool or cold water for 45–60 seconds. Repeat this 3–4 cycles, always finishing on cold. Keep the water temperature within your tolerance: if your skin burns or goes numb, it is too extreme. For extra control, use a handheld shower head so you can target specific muscle groups rather than chilling your whole body at once. This routine is especially useful after strength training, HIIT sessions, or long runs when you feel heavy-legged and inflamed.
Using hot and cold compresses with household tools
If you do not want to change your whole body temperature, local contrast therapy with compresses is a smart option. You can combine a microwaveable hot pack or warm, wet towel with simple cold packs or a bag of ice wrapped in a cloth. Apply heat to the target area (for example the knee or lower back) for about 3 minutes, then switch to cold for 1 minute. Repeat for up to 15–20 minutes total. Always place a fabric barrier between skin and ice to prevent cold burns, and never fall asleep with a hot pack on. This method works well for desk-related stiffness in the neck and shoulders, as well as light post-training aches where you want to boost blood flow without a full-body plunge.
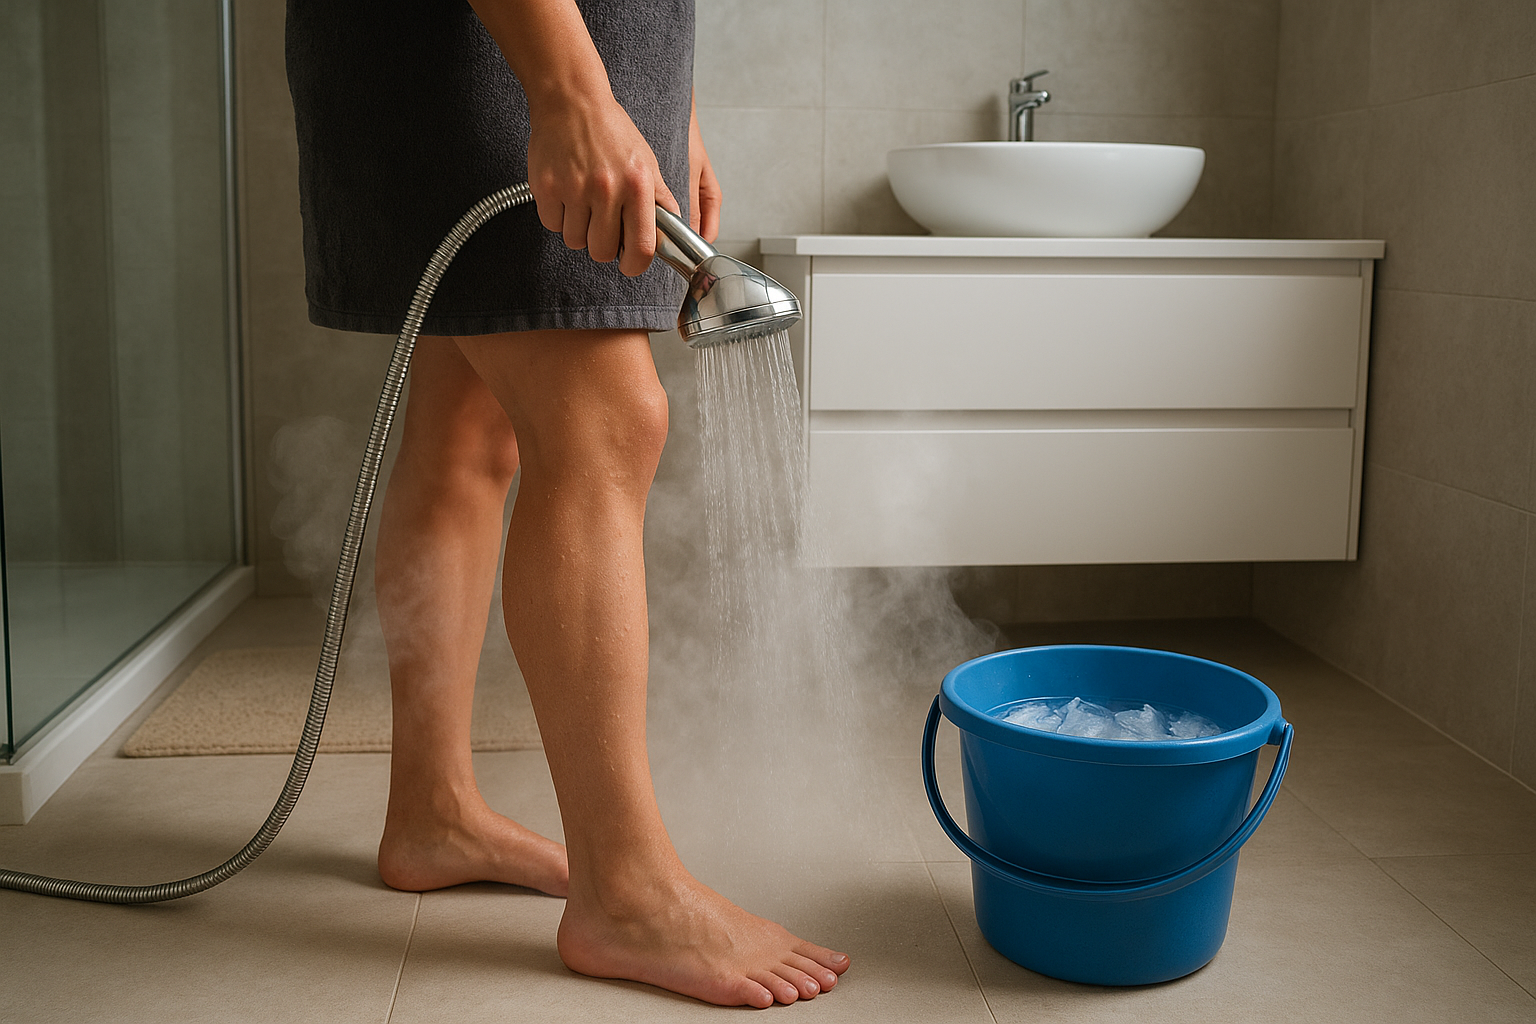
Cold buckets, foot baths and improvised ice tubs
For lower-leg and foot recovery, a cold water bucket or foot bath is extremely effective and requires almost no equipment. Fill one bucket with warm water (roughly 37–40 °C, similar to a comfortable bath) and another with cold water (around 10–15 °C, using ice cubes if needed). Place your feet and lower legs in the warm bucket for 3 minutes, then move to the cold bucket for 1 minute. Cycle through 3–5 rounds. This is ideal for runners and lifters with achy calves and feet. If you have a larger container or portable tub, you can adapt the same idea for shins or even hips, but do not push the cold too far; moderation is enough to stimulate circulation and reduce swelling.
Safety rules, timing and who should avoid contrast therapy
To keep DIY contrast therapy safe, respect a few essential rules. Limit total session time to about 15–20 minutes, and avoid extreme temperatures that cause pain, dizziness or intense shivering. Do not use contrast therapy on open wounds, infected skin or areas with reduced sensation. People with cardiovascular issues, uncontrolled high blood pressure, diabetes or circulatory disorders should talk to a healthcare professional before starting. Post-workout, allow 10–15 minutes of gentle cool-down and hydration, then start your hot–cold routine. In the evening, keep sessions moderate so you do not overstimulate your nervous system before sleep. Use contrast therapy as a complement to good nutrition, sleep and progressive training, not as a shortcut to ignore pain or serious injuries.
When used thoughtfully, contrast therapy at home is a powerful yet simple tool to support recovery, ease muscle soreness and keep your training consistent. With basic elements like a shower, buckets, and hot–cold compresses, you can build routines that fit into busy days and target both full-body and local discomfort. Focus on moderate temperatures, sensible timing, and listening closely to your body’s feedback. Combined with smart programming and adequate rest, these DIY hot–cold strategies can help you move better, feel fresher, and stay on track with your home gym goals.